 Jewelweed – bee forage and a treatment for poison ivy We’ve got several uninvited guests to the garden party, and for a while didn’t know who any of them were (well, we're more like the uninvited guests, since many of them were here before us!). We picked up this book – Wild Urban Plants of the Northeast – a great field guide by Peter Del Tredici that helped us to identify several of these visitors and learn more about them. We highly recommend this easy to use field guide, as it has opened our eyes to plants we've seen every single day, but can't name. Here are some we found (there are definitely many more) pictured below with a brief description of uses as provided by the field guide: Jewelweed, Pokeberry, Yellow Nutsedge, White Campion, Pale Smartweed, Lambsquarters, Purslane, Dandelion, Greater Celandine, Spotted Spurge, Bittersweet Nightshade, Wild Mint, Yellow Woodsorrel, Fireweed, and Garlic Mustard. We've also seen (but don't picture) Yellow Flag Iris, Bindweed and many others. 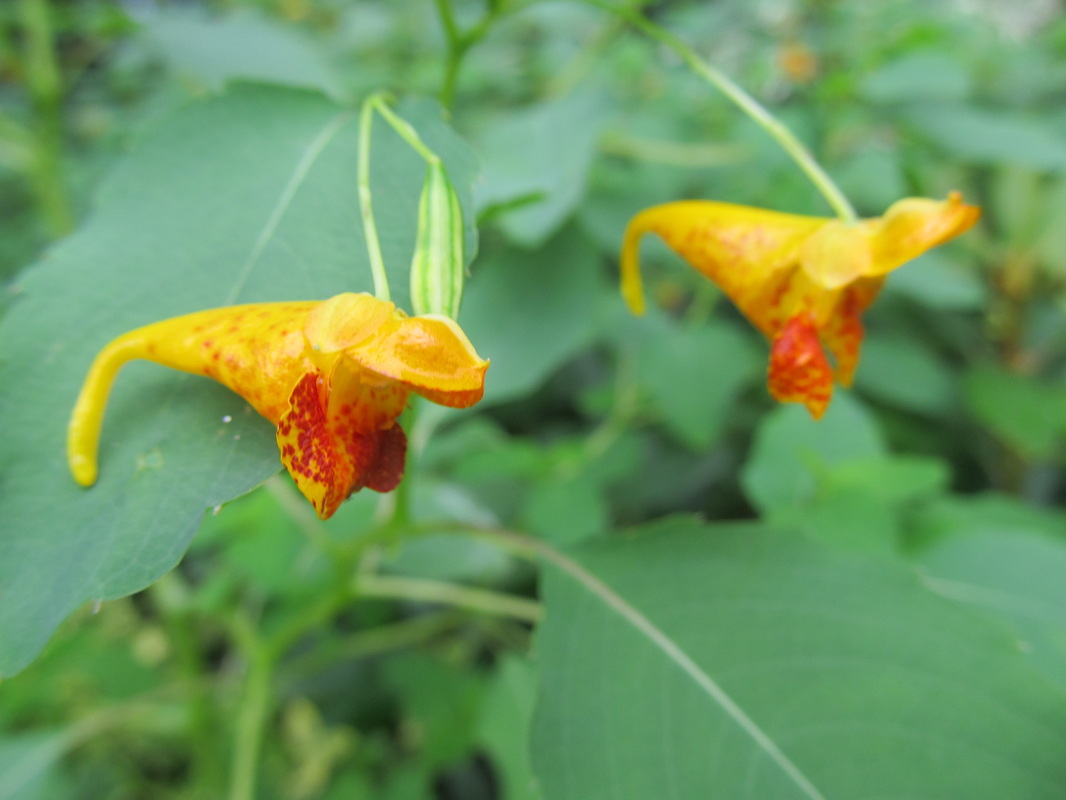 Jewelweed – bee forage and a treatment for poison ivy  Pokeweed – the young shoots can be used as an asparagus substitute, tincture of the ripe berries was used as a remedy for chronic rheumatism. Mature berries also have been used in pie making, however use with caution 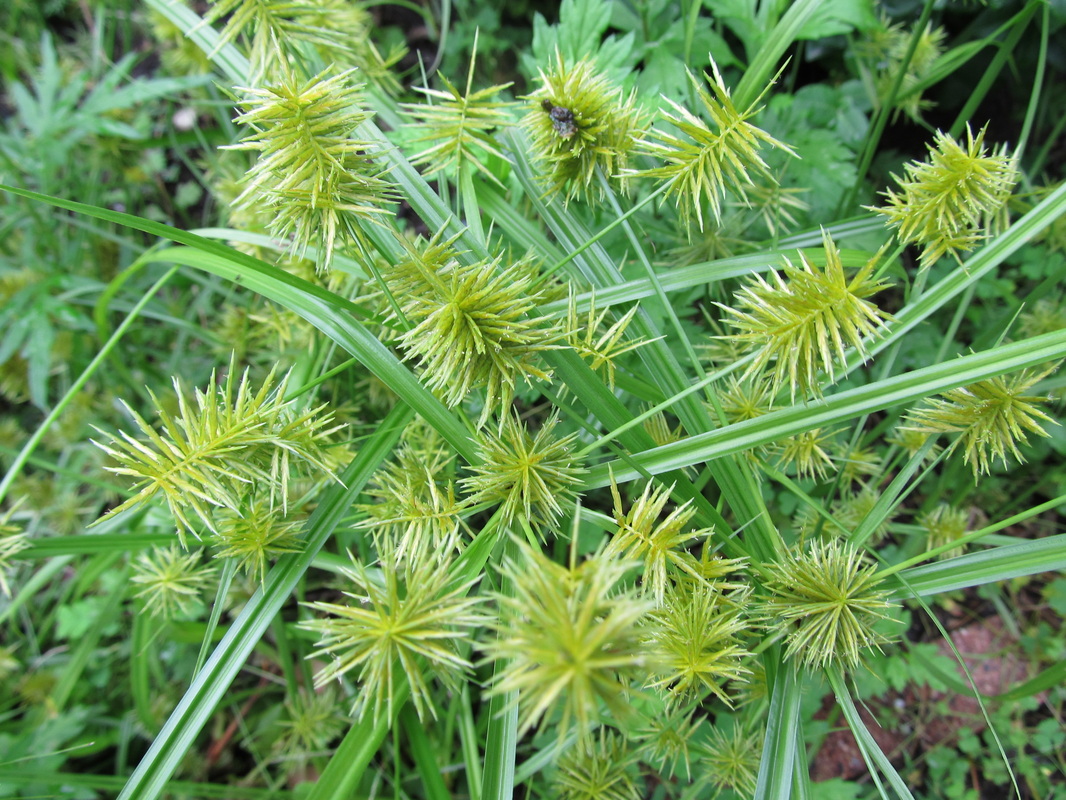 Yellow Nutsedge 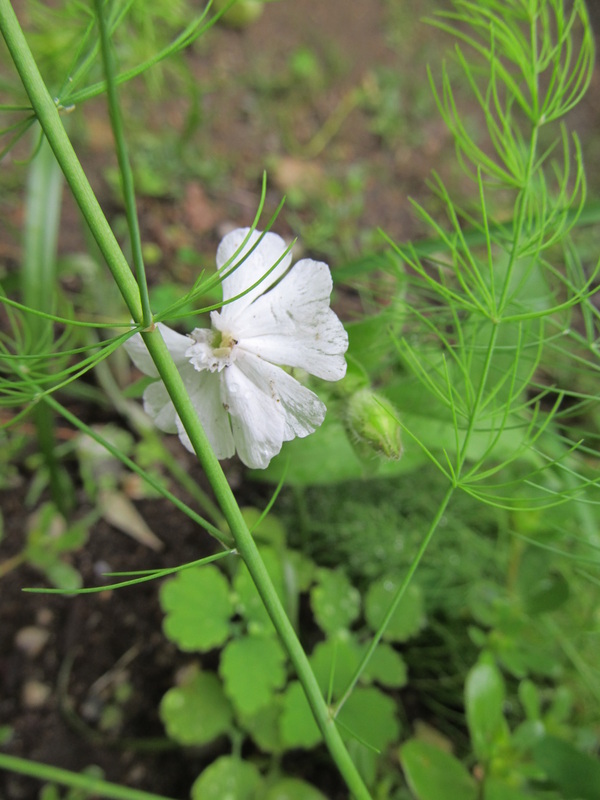 White Campion - can accumulate zinc, young shoots can be eaten in spring 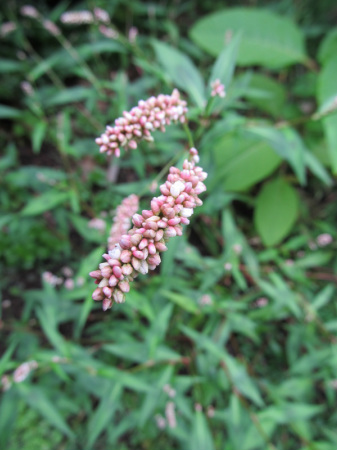 Pale Smartweed – tea made from the whole plant used to treat diarrhea and a poultice of the leaves can treat hemerroids 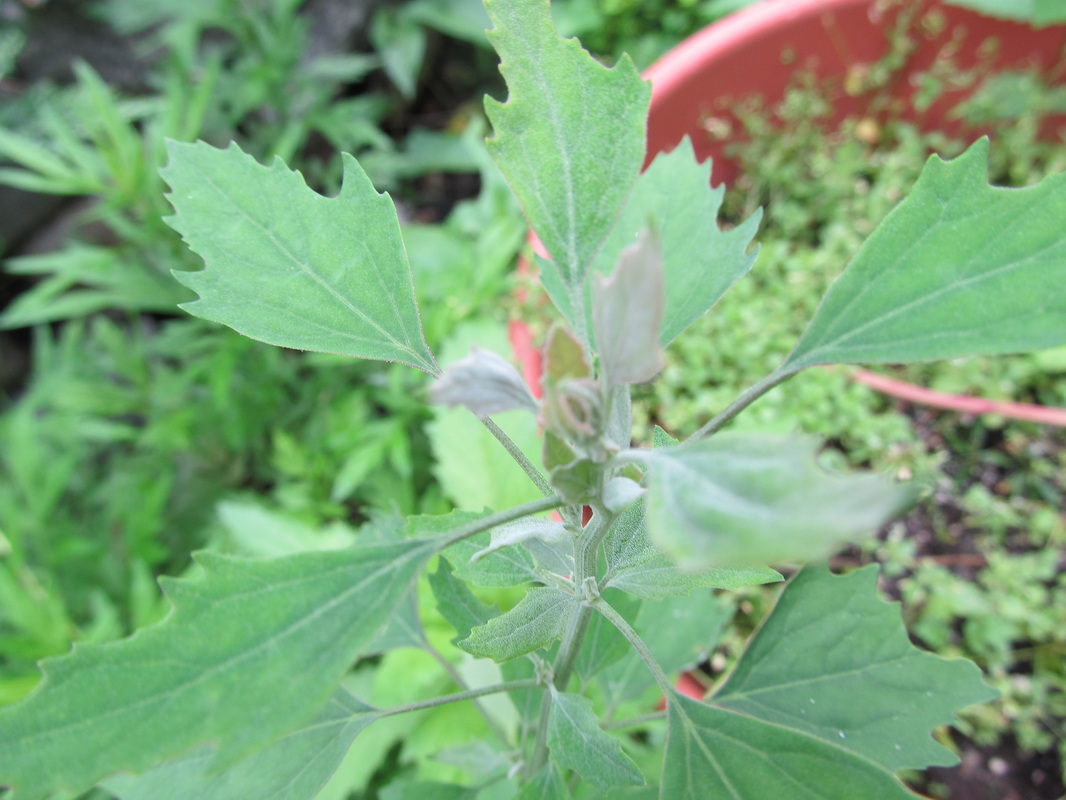 Lambsquarters – young shoots are edible in the spring, the seeds can be boiled to make gruel or baked into bread  Purslane – edible, great in salads, soups/stews or sautéed briefly, high in omega-3 fatty acids 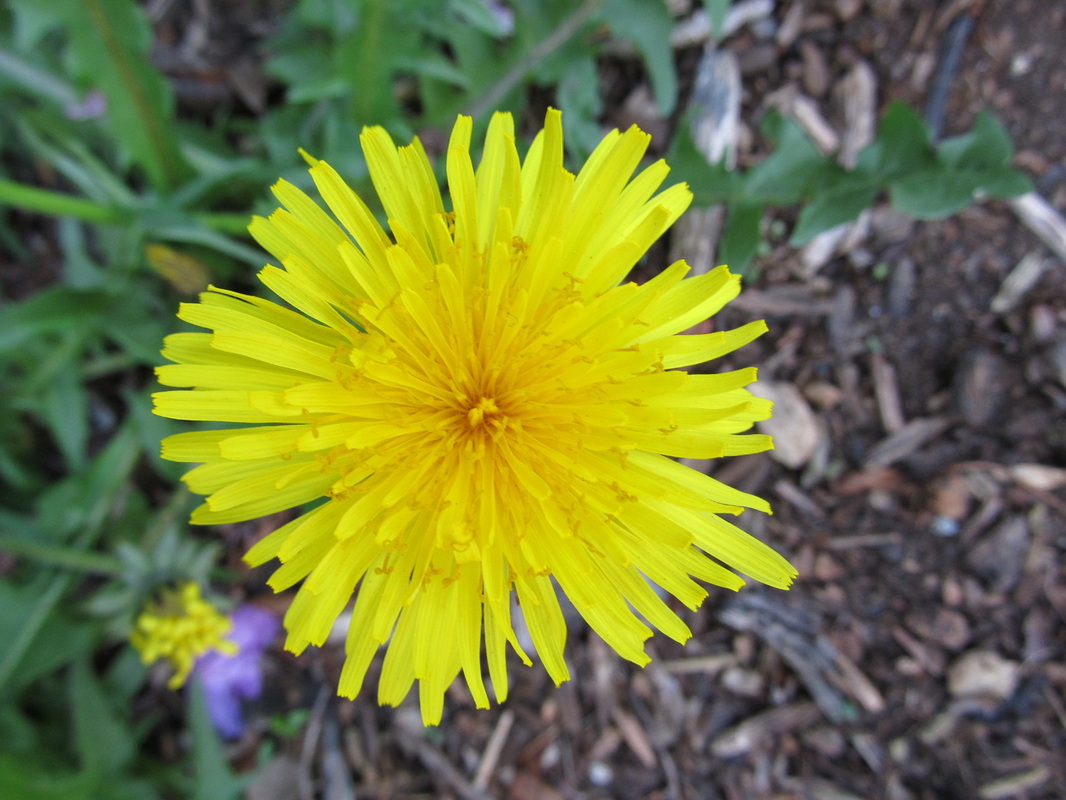 Dandelion – early greens are edible and high in nutrients, flowers can be fermented into a wine, tea, beer 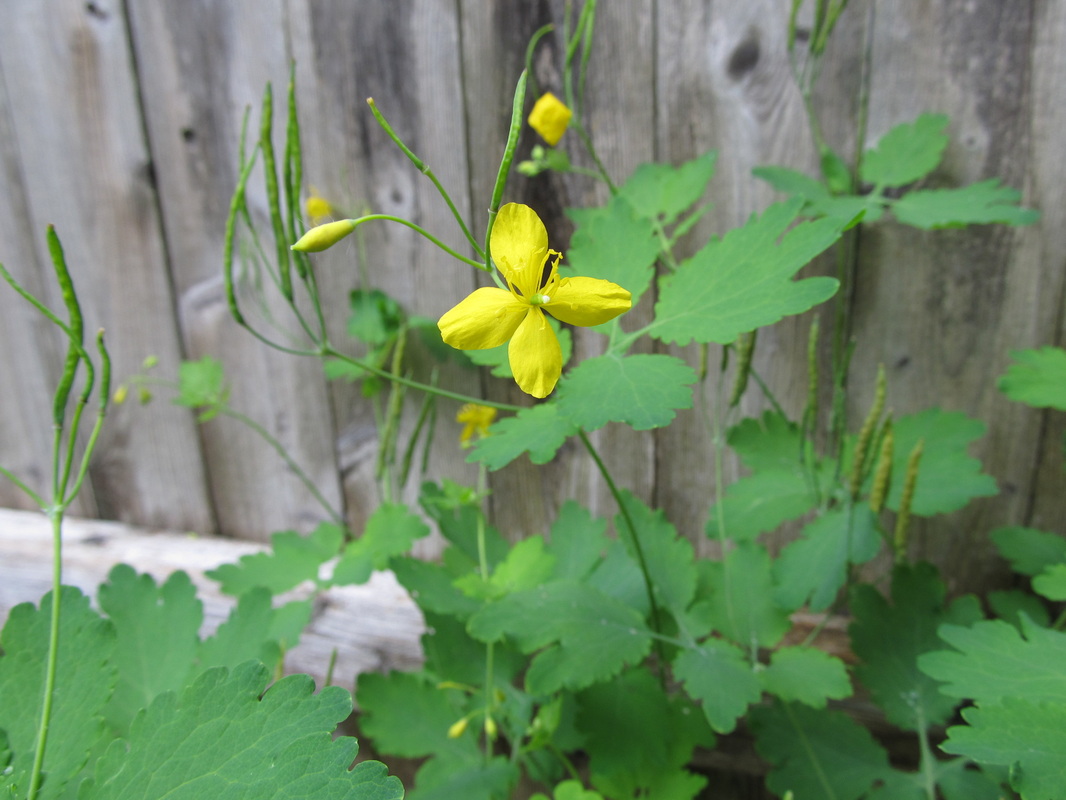 Greater Celandine (swallowwort) – has been used to treat skin diseases, the orange sap may irritate skin  Spotted Spurge - has been used as a blood purifier and to treat urinary problems. Toxic to livestock and milky sap can irritate skin 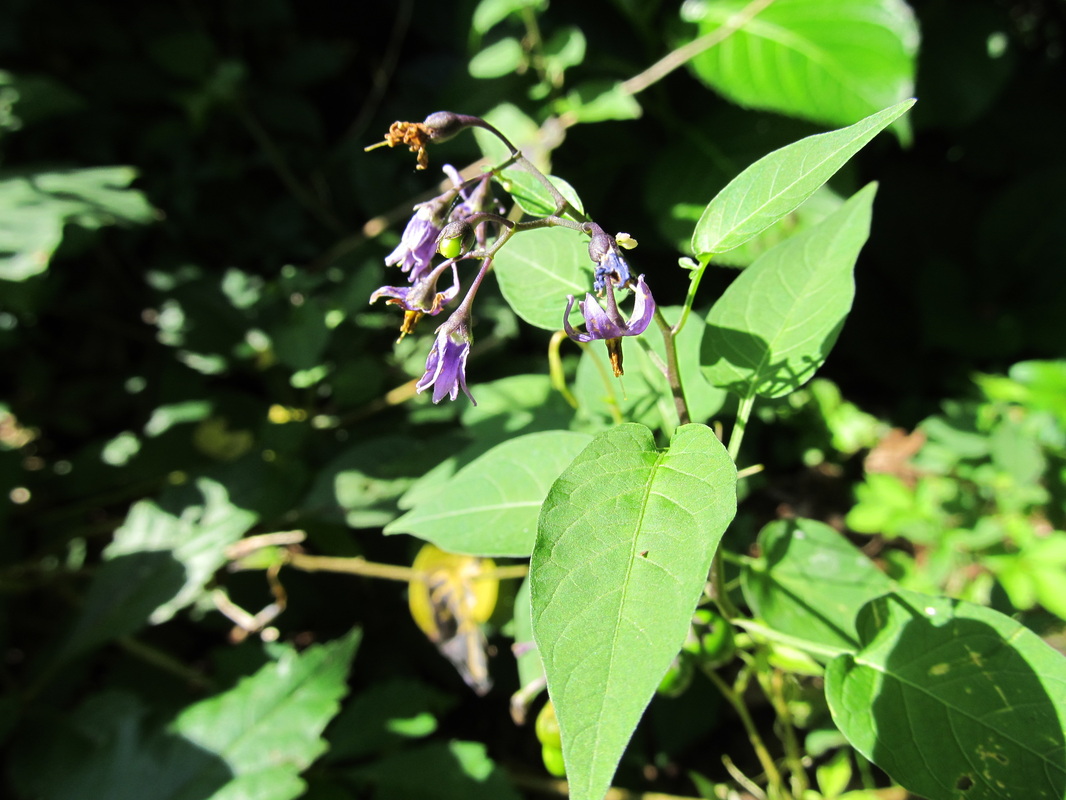 Bittersweet Nightshade – in flower; foliage is toxic and somewhat narcotic, ripe red fruits are harmless. Has been used to treat warts, jaundice and rheumatism. Extracts have shown some anti-cancer activity. 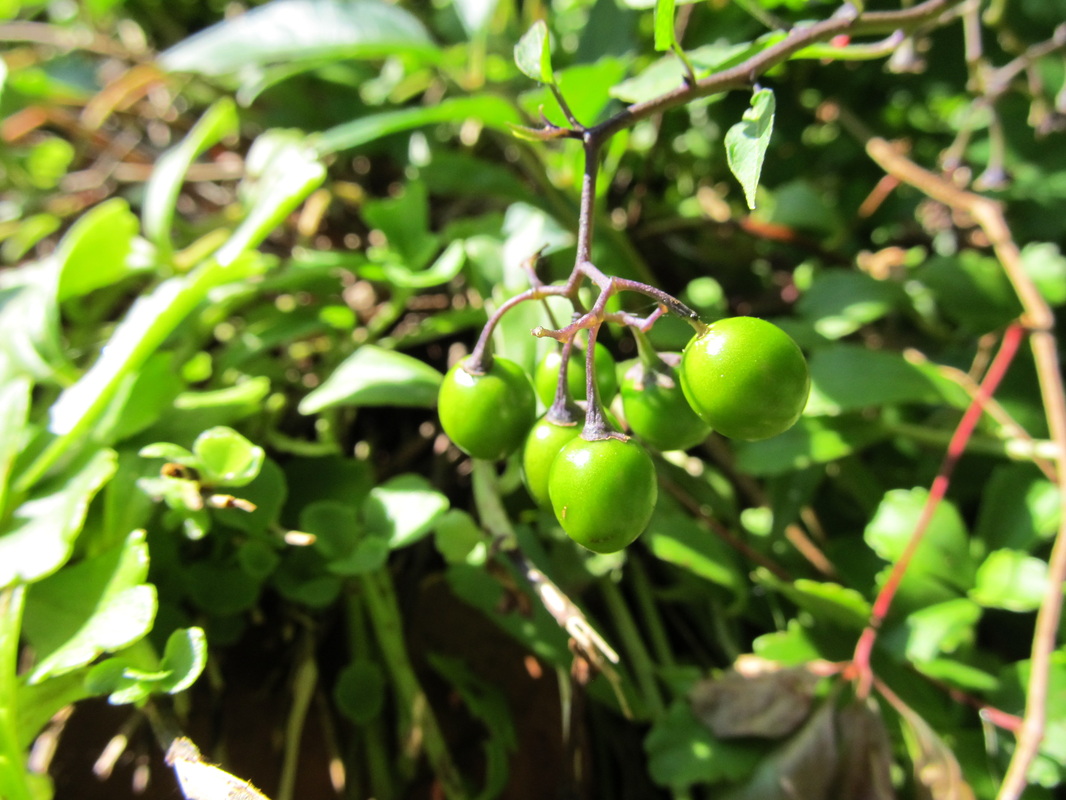 Bittersweet Nightshade – unripened fruit; foliage is toxic and somewhat narcotic, ripe red fruits are harmless. Has been used to treat warts, jaundice and rheumatism. Extracts have shown some anti-cancer activity.  Wild mint (peppermint we think)  Yellow Woodsorrel – edible leaves high in oxalic acid 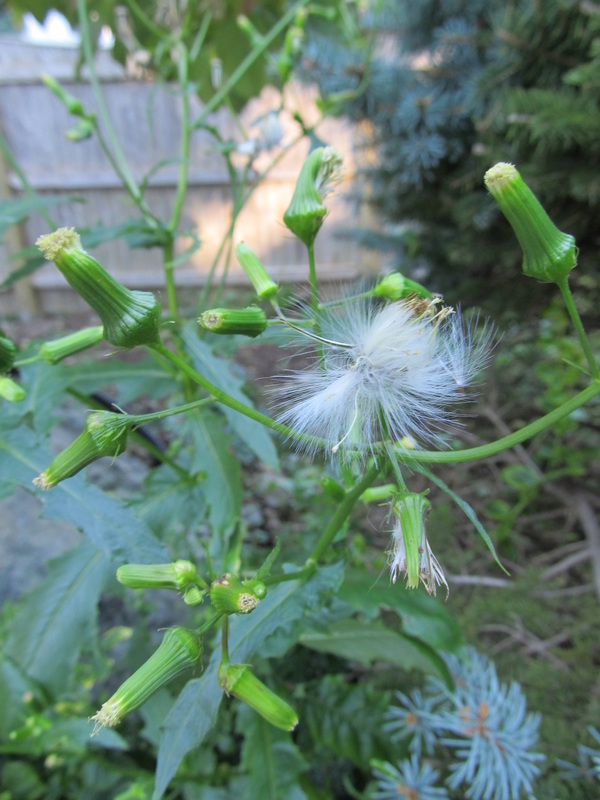 Fireweed – has been used to treat hemeroids and extract has been used to treat lung, stomach and bowel diseases 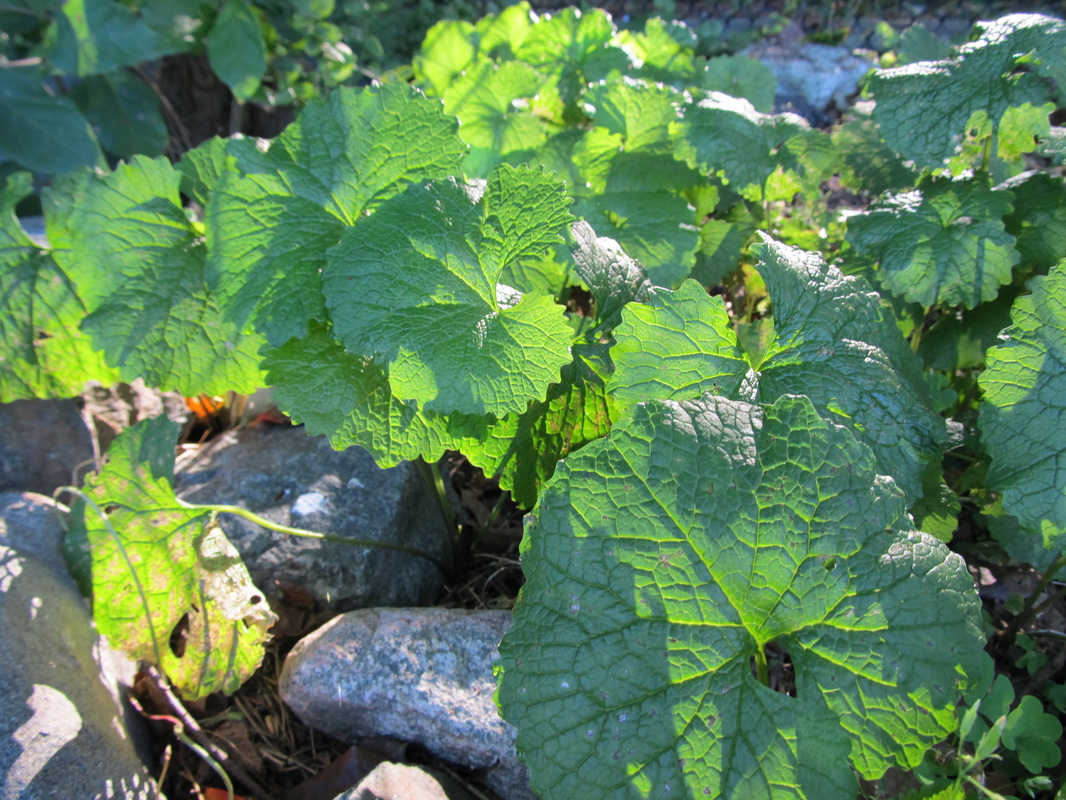 Garlic Mustard – early spring tender greens are tasty in sandwiches and soups So far we've eaten Dandelion greens, garlic mustard, purslane, and played a lot with the exploding seed pods of the jewelweed. What wild plants have you found in your area that you find particularly useful?
2 Comments
We made this short video in mid-August showcasing some plants that reside in our backyard garden, including several annual and perennial vegetables, herbs and flowers, and home composting. Growing our own food is but one aspect of permaculture we are practicing. Share with us your videos in the comments or via email!  Teacher Jonathan Bates on polyculture design We took our PDC last fall with Permaculture F.E.A.S.T. (for ecological and social transformation). As working folks, we could not find the time off to attend a week-long course. F.E.A.S.T. is one of the few offered on weekend. We woke up every other Saturday for 4 months at 5:30am for the two hour drive to Northampton to start class at 9am. We'd return after a full weekend of theorizing and practicing permaculture principles and ethics, urban homesteading, forest gardening, water harvesting, soil regeneration, creative waste cycling, micro-livestock, energy and building systems, social justice, food systems planning, cooperative economics, design for climate change, community building, aquaculture, design projects, methods, and tools. We spent a lot of time talking and digging deep, unlearning and learning, thinking and strategizing. We did hands-on, skills-building activities during the course and have been immediately able to apply with little previous knowledge most of the projects and methods we learned about during the course. This includes our aquaponics system, our backyard polyculture plantings, harvesting rainwater, organizing the permaculture convergence, and doing it all with 'permaculture goggles' on. We had an incredible teaching team and field trips to local permaculture sites. Our permaculture trip was catalyzed by this design course, and we highly recommend it. There are only a few spots left for the Fall 2012 course, so register now. We've posted several videos on ourYouTube channel from the course and have shared one and some photos below. There are also pictures from the design project we did as part of the course if you are interested in learning more. If you've taken a PDC, share your yields in the comments. We'd love to hear what skills and ideas have been influenced by such a course.  Guest Teacher Eric Toensmeier on Edible Forest Gardening in Holyoke, MA 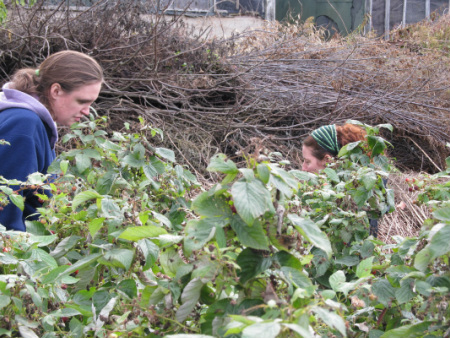 Raspberry picking and eating at Tripple Brook Farm in Southampton, MA 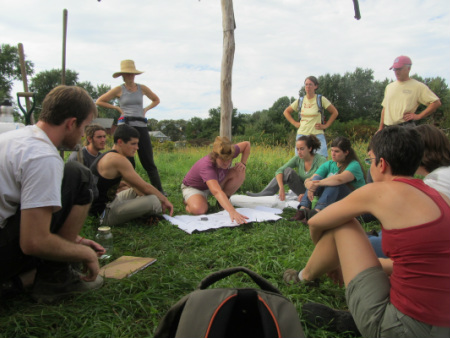 Looking at food systems and permaculture design at Montview Neighborhood Farm with teacher Lisa DePiano 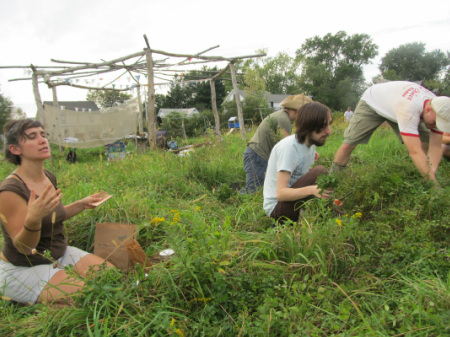 Harvesting sage and mint and talking about tinctures, teas and herbal remedies with teacher Javiera Benavente 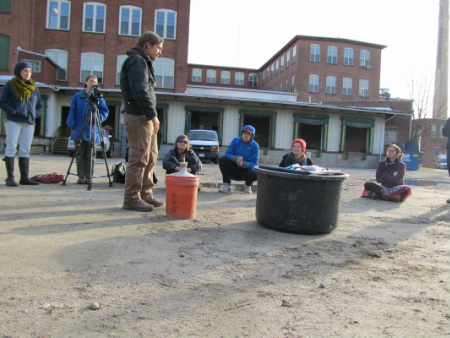 Guest Teacher Scott Kellogg on Biogas and Aquaculture 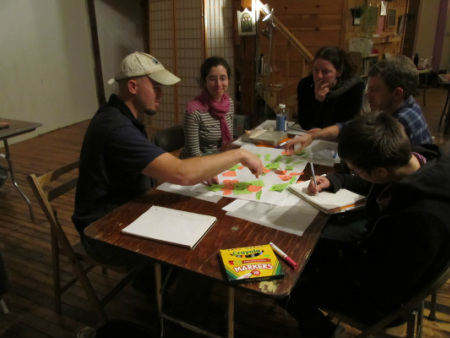 Design work in the classroom - word association exercise to generate ideas. 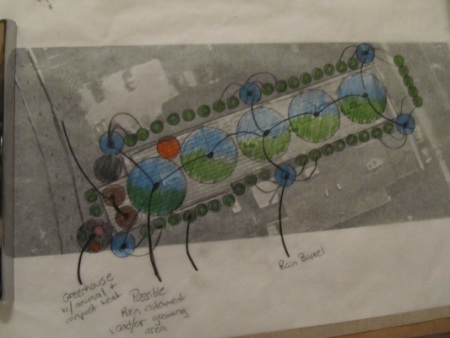 An 'alternative' design option for the rooftop of a community center We sponsored and helped to organize the Northeast Permaculture Convergence this year to contribute to strengthening the Eastern MA permaculture community. It was an incredible experience pulling together a weekend event attended by over 300 people, designing a system of workshops, food, and shelter with little to no upfront financial infrastructure or support. It was also very exhausting, however, we believe the event met its goals of gathering permaculture energy in an area where it may be weak or disconnected. We held the event at Soule Homestead Education Center, a working farm that offers farm-based children's environmental programs, adult workshop, and family cultural events. Frank the director was an incredible host and partner to work with on this event, connecting us with local businesses for tents, food, and provided live local entertainment. After the convergence, we started a new Eastern MA Google Group to connect regularly over the interwebs, as well as an Eastern MA Guild group on the Northeast Permaculture Ning. We started this month meeting to connect and share ideas, and we're looking forward to seeing what forms moving forward. Contact us if you are interested in hosting or facilitating guild meetings. If you aren't from Eastern MA, many conversations that started at the convergence are continuing online at the Northeast Permaculture Ning and notes are stored in a shared google doc. This was our first permaculture gathering, and we are interested in what a yearly Eastern MA convergence would look like - a small one day gathering with discussion groups, workshops, food and entertainment. If anyone is interested in helping to plan or organize such an event, please let us know! We look forward to connecting with more folks in our area sharing thoughts and actions. In the meantime check out the photos we took at the event: We found a great how-to make a potato barrel article in Scott Meyer's The City Homesteader. We wanted to use a bit less space, experiment with the idea and hopefully prevent something from eating them. This is how we did it for about $20 from a local garden store (we already have a drill). Materials:
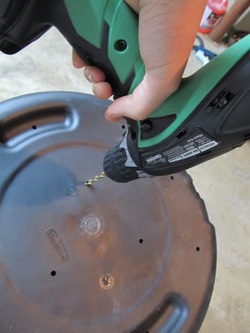 Step 1: Drill holes in the bottom of the barrel Step 2: Set up a brick or cinderblock platform for air flow and drainage outside in an area that gets at least 6hrs of sunlight daily. Step 3: Fill the barrel with 6" of a 1/3 potting soil/compost mix 2/3 peat moss mix Step 4: Plant the potatoes eyes up as deep as they are large. We cut ours into small 1" x 1" chunks right before planting. Step 5: Water well. Keep moist but not too damp. Step 6: As they grow, continue to fill the bucket with the same mixture up to the potato's top leaves, until the bucket is full. 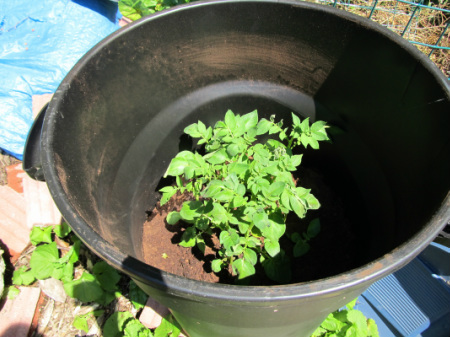 Step 7: Harvest. We've read that in general that you should wait until after the leaves die back to harvest. You can just tip over the barrel if you have a place to lay them or dig them out. We haven't done this so if this changes significantly we'll let you know.
We just wanted to give you the quick run-down - it only took less than an hour to put together once we had all the materials. For further reading, Mother Earth News provides the City Homesteader from the book here. Remember the seedlings we started? This is them a few weeks later. Overcrowded, probably a little stressed out, but still exciting. We wanted to share what we probably will (and won't) do the second time around. 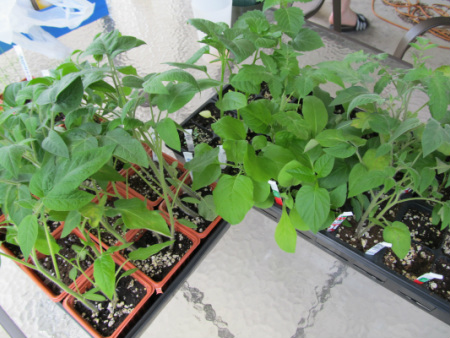 What we won't do again... 1) Skipping starting seeds in flats. We thought we could get away with saving the extra time, but flats are a great idea, and its obvious to us now why they are listed in the instructions of every seed packet. By planting multiple seeds into small-ish pots first, we ended up having crowded seedlings, making it hard, and sad, to separate and destroy some of them. It also became incredibly hard to water with them all so crowded. We had to cut a piece of tubing to pour water through to deeply water each compartment without drenching the foliage. 2) Planting 14 varieties all at once. Maybe we'll try this after we have more experience. Too much to keep track of and worry about. 3) Starting tomatoes, and other heat loving vegetables, way too early. Roger Swain in our Master Gardener course told us to WAIT a few more weeks to plant tomatoes, peppers, etc. We didn't listen, and our greenhouse transplants already hit an almost freezing week. These plants don't like temperatures below 50F, so if you won't have space for them inside as they grow, wait until mid-April to start indoors in our climate (Zone 6), and transplant outside in mid-late May. 4) Using potting soil alone. Although it has produced great results, we are going to try and mix our soilless mixnext time. ------------------------------------------------------------------- What we will do again... 1) Starting seedlings indoors. For very little $$, we were able to set up ideal growing conditions (at least with light) without worrying about pests or other environmental stress. 2) Planting stuff we really really want to eat. Even though the alpine strawberries we planted are TINY and won't provide us with fruit for at least a year, it is something we are looking forward to, and don't mind taking care of while it grows. 3) Redundancy. We finally got around to transplanting the crowded seedlings into larger pots - mainly to end our stress of possibly killing them all if we didn't thin the herd and give them some much needed space. We chose the three strongest plants of each variety for a 1 gallon pot for the greenhouse and small pots to stay indoors. Any additional seedlings we planted directly into the soil. It's like an experiment - some will remain in controlled light and water conditions, others in the semi-controlled conditions of the greenhouse, and some we planted without even worrying about hardening off (the last bit maybe not the best idea, but worth a try). 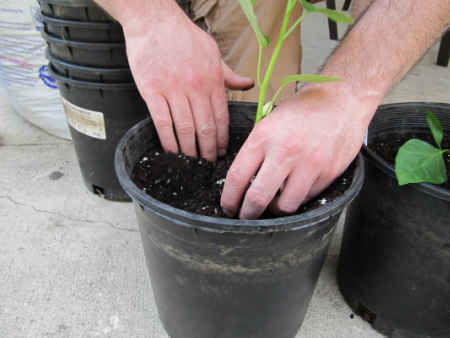 Mike transplanting into bigger pots 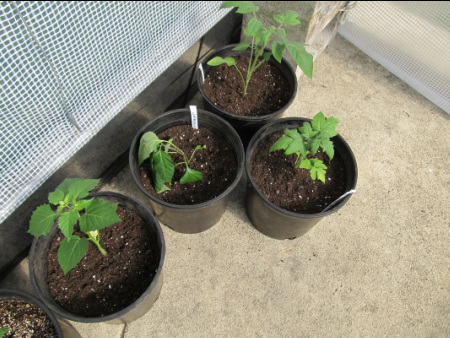 bigger pots in the greenhouse 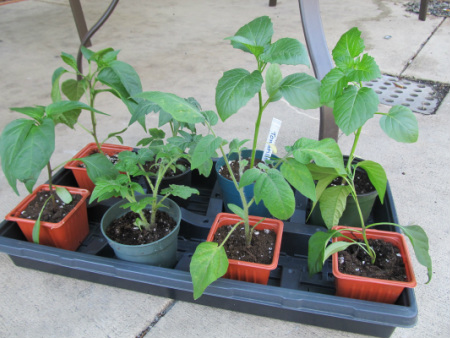 happier plants with more space We started a vermicomposting bin to make some worm castings for the garden, in addition to cold composting in the backyard. Why vermicompost? Like with composting, the practice diverts food scraps from the waste stream. Worm poop, or castings, is a nitrogen and microbiotic rich soil amendment that takes very little effort on our part to create. The initial input to create the bin is only a couple of hours, and if you keep the it inside, it requires even less energy to transfer food scraps. Here is how we did it with a few materials in 10 easy steps. What you need:
Cost: $50-$60 project We had most of the materials needed already, so spent approximately $20 on materials and $30 on the worms. We found the hardware cloth and aluminum window screen in the garage, so if this is not something you already have, expect to spend an additional $10 for it. 10 Step Instructions Step 1: Drill several drainage holes in the bottom of the container, a few inches apart. There is really no set formula for this, just space them relatively evenly and make sure they are distributed throughout the bottom to provide even drainage. 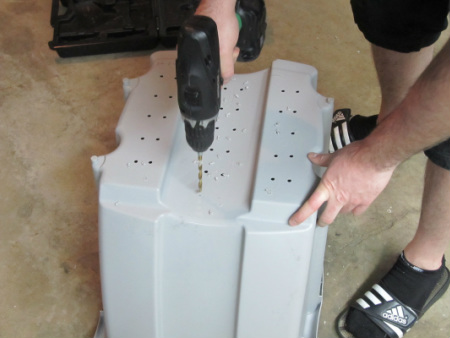 Step 2: Measure a piece of aluminum screen slightly larger than the bottom of the bin. Fold the edges, and hot glue the wire to the bottom. This will keep the food scraps, bedding and worms from clogging the drainage hold. 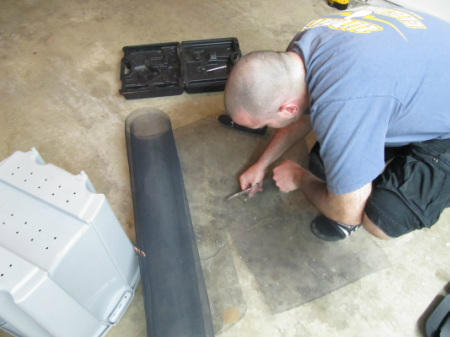 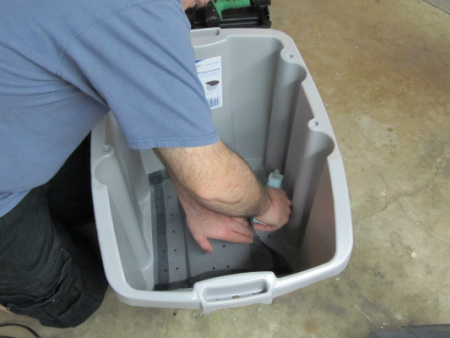 Step 3: Cut a hole approximately 3" x 6" in the lid that fits the bin 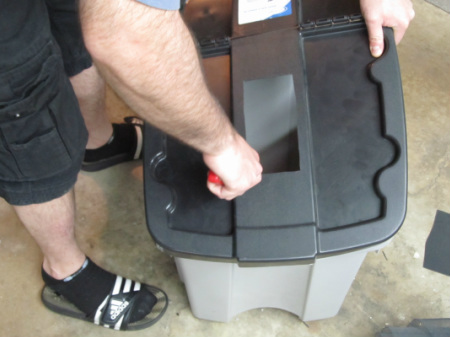 Step 4: Measure and cut 1 piece of aluminum screen and 1 piece of hardware cloth that are slightly larger than the hole you cut in the lid that fits the bin. Step 5: Lay the piece of hardware cloth piece on top of the piece aluminum screen. Screw the pieces in that order on top of the hole to hold it in place. This will provide air circulation into the bin and keep anything from getting in or out of the box. 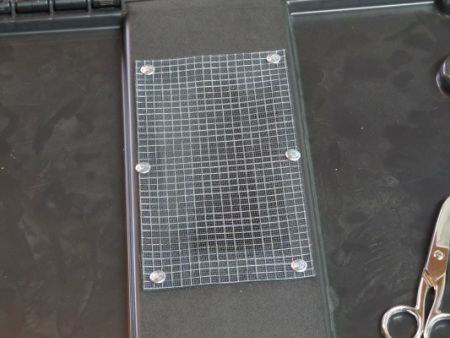 Step 6: Set the bin on top of the larger lid that will act as a drainage tray. Add shredded newspaper. We used a shredder and then ripped the long pieces into smaller ones by hand. Step 7: Moisten the newspaper using water that has a neutral pH (7) - that's what worms like. The newspaper should feel like a rung-out sponge. 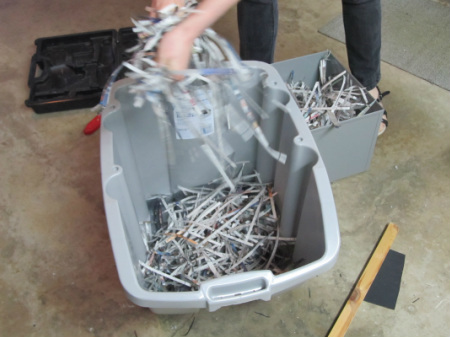 Step 8: Add your worms! We purchased them online, and added the worms to the bin within 8 hours of receiving them. We had to scramble a bit, so be prepared with the worm bin or be willing to start making it the day you receive the worms online or sourced locally. 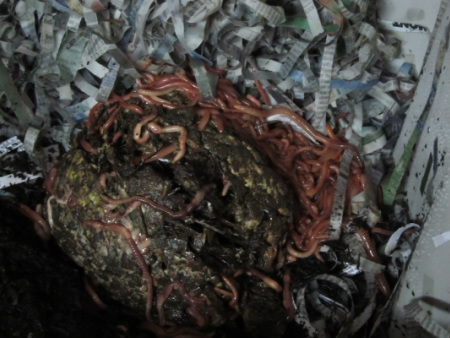 Step 9: Leave the worms in the light for about 30 minutes - 1 hour. This will force the worms down into the newspaper bedding you created. When they sense light, they fear being seen by a predator, so will quickly dig down.
Step 10: Cover, and move the bin to your desired location where it is around 70 degrees. Inside this is easy, but if you have it outside, it will need to be brought in over the winter. The bin definitely doesn't smell if you take care of them! That's how to set it up. We've had it for about a month now, and this is what we've learned to maintain it with a little food scraps and water: What you need:
The newspaper will provide enough food as it breaks down for the worms in their first 3 weeks. Start keeping food scraps in the kitchen, letting them warm up and start to breakdown before feeding the worms. We started feeding them once a week, and you can increase the frequency overtime. The larger the bin, the more often you can feed them. Moisture: Always keep the bedding moist so that it feels like a rung-out sponge. We spray the bedding gently with water from a spray bottle once a week. Keeping a full bottle of neutral pH water right next to the bin makes this job easier. Harvesting: We're not there yet, but here is a good method we learned:
Now we have fish and worms that we are taking care of, while they produce yields to feed us and make the soil healthy. We finally started our first seedlings that we are trying really hard to keep alive. We started several seedlings over the fall and winter, alongside house plants that came as orphans, gifts, or impulse purchases, but none of them survived. We're going by the rule that its o.k. to kill a plant 3 times before it actually grows so we don't feel so bad about ourselves (although it still does hurt when things die on our watch). Where did we get the seeds? We purchased seeds from Bountiful Gardens, Baker Creek and various garden stores we've stopped in over the last few months. We even saved some pepper seeds from the farmer's market last year. We put together a long list of local and organic seed suppliers on our resources page if you are looking for more ideas. 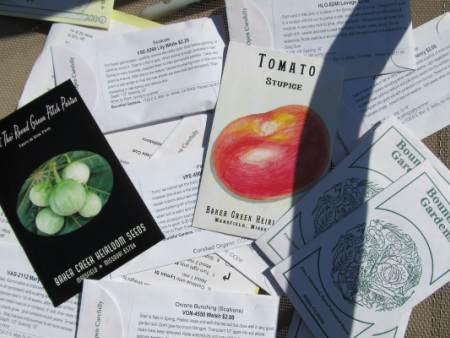 Notice the beautiful artwork and photography on Baker Creek and Bountiful Gardens seed packets  seeds saved from farmer's market red and green peppers How did we decide what to plant and when? Months ago, as the first step in any permaculture design process, we articulated our goals. We wrote down what we wanted to eat and why to make sure we didn't take on too much to manage. Sure we still bought some seeds that we probably won't plant this year, but referring to our goals constantly allowed us to ask, do we even eat artichoke? Let's not plant it right now. Based on our time and experience constraints, we aren't able to create a permaculture paradise with hundreds of varieties in one season, especially our first. We mapped all of the seeds we bought out on an excel sheet (in total 54 packets!) to track what conditions they like, how long they take to germinate, and when we should plant them in our climate. There are so many apps and websites out there that tell you what to plant when, but we've found some conflicting information on average last frost dates and what we should be planting, so we've gone mostly with seed packet directions, our best guess, and a general sense of what other folks we know are doing. If we can't start to trust our instincts now, then we won't be able to learn from our mistakes. Out of all of the sites we've found though, we like best what Mother Earth News has put together. Some need to be cold-stratified... What does that even mean? We didn't know this process even existed before now, but the seed packets came with pretty clear instructions (Bountiful Gardens even provided a more detailed info packet to go with it!). We started cold-stratifying some shrubs and trees in the fridge several weeks ago, and they're about to come out tomorrow! We stored them in damp cotton balls and marked them with names and dates in plastic sandwich bags. We didn't soak overnight in water which some people recommend, so we'll see how well they do when we put them in some soil and get them warm. Some seeds need to be scarred in addition to cold stratifying, which was noted on the seed packets too. 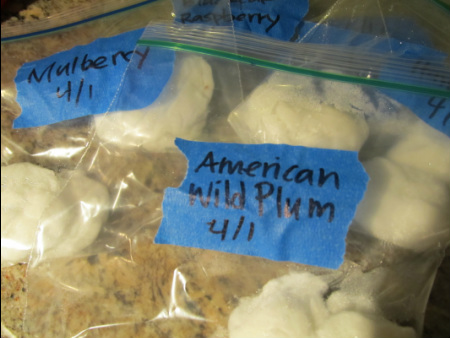 cold stratifying Some should be started indoors to extend the growing season... Two weeks ago we started tomatoes (3 varieties), jalapenos, tomatillos, asparagus, strawberries, peppers (3 varieties), kale, scallions and eggplant (seeds we identified as priorities in our goals) in seedling starter kits we bought for about $5. We decided not to start them flats and then have to transplant them, and went right for small little containers that we soaked in a bath of water and a little dish soap filled with organic potting soil. We made labels by cutting up a sour cream container and writing permanent marker. Pencil works too since the lead won't degrade. 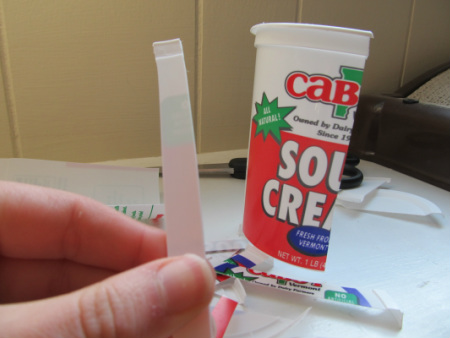 DIY seedling markers 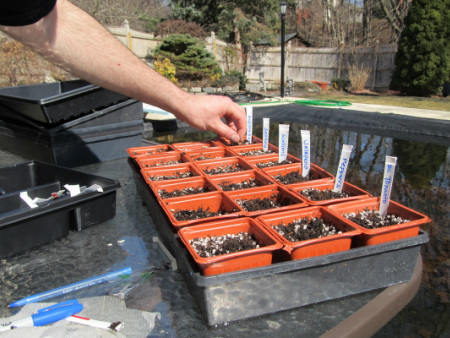 seedling starter kit We followed the instructions on the seed packet as best we could when planting, scarifying if we needed to, paying attention to depth and spacing, although we found ourselves questioning if we did everything right. This is probably normal but we made it a point to go with it. Everything can't be perfect, especially the first time around. What do we use for grow-lights? We put the seedlings inside on a shelf underneath fluorescent lights approximately 3" away from the top of the soil. We bought shop light fixtures for $12 and installed one warm and one cool bulb in each fixture for about $9 for a pack of 2. The ideal is to have one 2700k - 3000k bulb (warm) in the red spectrum which promotes flowering and one in the 5000k to 6500k bulb (cool) in the blue spectrum which promote overall green plant growth (this information can be found on the package). 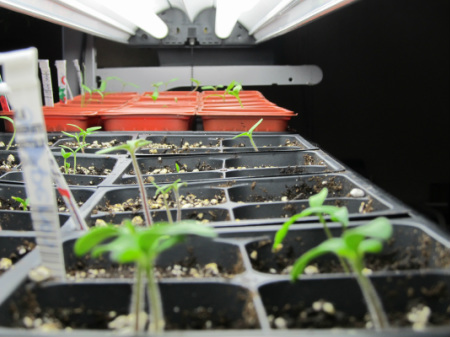 seedlings under the grow light What we've done to keep them alive... So far we are getting so excited watching life emerge that will soon become a food source for us, and I think that excitement transfers over to them. The kale has been the most exciting, since the seedlings look super strong and powerful popping out of the soil. We are almost surprised that they are growing so well considering how semi-stressed we were planting them, wondering if we were doing everything right. We've done a full water once a week, and gently mist the top when they seem dry. We've had a pretty good germination rate and haven't added any fertilizer. We do test the water for pH before adding it since they like a slightly acidic pH of around 6.8 (just under neutral). We have highly alkaline tap water from the municipality where we live (upwards of 9), so we have been adding General Hydroponics pH down to adjust it. We've thought of lemon juice as a more 'organic' to bring the pH down, but we already have the stuff the aquaponics system, so went with onsite resources. Next steps... Transplanting into the design... 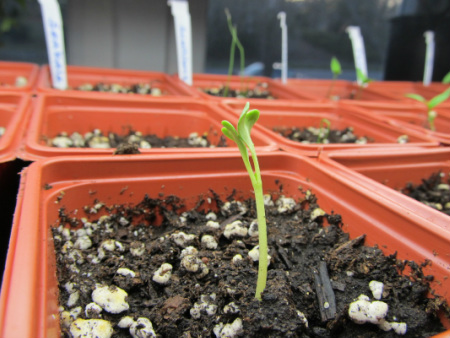 kale seedling We started our Master Gardener Training the other day with a full day lecture on soil. The instructors joked that we shouldn't worry about finding the subject of 'dirt' interesting (generally assuming it hadn't been before for most of us). Having been through a permaculture design course with Jonathan Bates who loves dirt, we had a place to hang new terms, data and history from the lecture. Dawn Pettinelli of the University of Connecticut was our speaker, and she had an incredible passion for the life within the soil we walk on. She held up a coffee cup and said, "in one coffee cup of good garden soil, there are more micro-organisms than there are people on earth". She spoke about how much our lives are dependent on the life in the soil below our feet that we don't often acknowledge or sometimes even know about. When we were in school, we learned that soil is "a mixture of sand, silt and clay", not the wonder of the life cycle web of the living, dead and really dead. We got to touch various types of soil, variations of clay, silt, sand, and what we have here, a sandy loam excellent for cultivation. Reminded of our project of regenerating where we live, we got home and added to and turned the compost pile we've built over the last several months, feeling somewhat proud of what we have created. 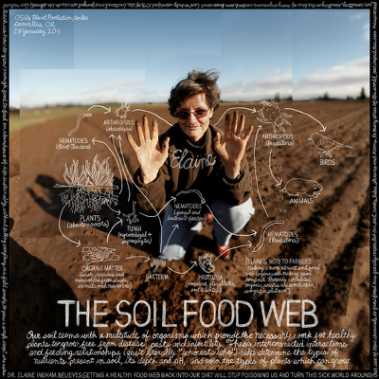
We're not quite sure why the winter was so warm, whether its climate change or solar storms, but we're happy to see these and other signs of spring! 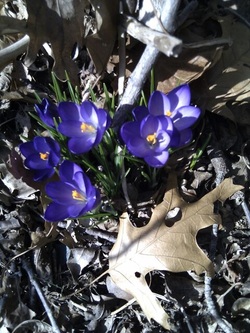
Last night we spent time chatting (literally talking back and forth) with a small frog and were greeted this morning by a couple of ducks. The pool cover gathers water every year turning it into a make-shift habitat for visitors in spring. We're hoping for baby ducks this year.
|
SearchCategories
All
Archives
December 2013
|
 RSS Feed

